Understanding Oil Burner Components in New York Long island.
We will now examine the key components of an oil burner that are essential for its operation. It’s crucial to understand these parts to effectively handle repairs or replacements of an oil burner system.
Combustion Chamber and Heat Exchanger
The combustion chamber is the heart of the oil burner, where fuel is ignited to produce heat. It’s a high-temperature resistant enclosure that ensures the efficient burning of oil. The heat exchanger, usually made of steel or cast iron, surrounds the combustion chamber and transfers the heat produced by the burning oil to the air or water in the heating system.
- Combustion Chamber: Ensures complete burning of fuel.
- Heat Exchanger: Transfers heat effectively.
Fuel Supply and Oil Pump
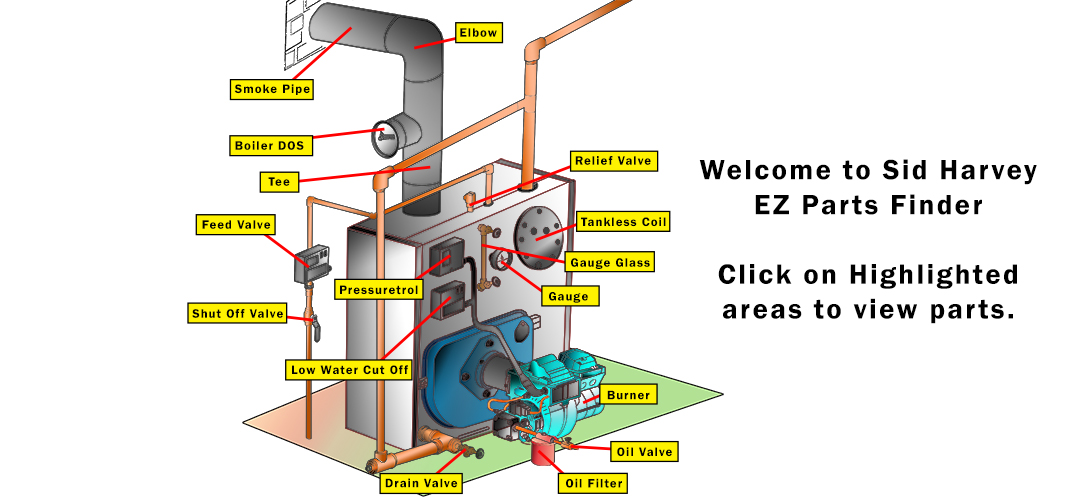
The fuel supply system consists of an oil tank that holds the fuel, which is drawn through oil filters and fuel lines to remove debris and prevent clogging. The oil pump pressurizes the fuel before it’s sprayed into the combustion chamber by the oil nozzle.
- Oil Tank: Stores heating oil.
- Oil Filters: Clean the oil from impurities.
- Fuel Lines: Transport oil to the burner.
- Oil Safety Valves: Prevent leaks and overpressure.
- Oil Pump: Pressurizes the oil for efficient burning.
- Oil Nozzles: Atomize the oil for better combustion efficiency.
Installation and Operation
When installing and operating oil burners, precision and adherence to safety standards are paramount. We’ll guide you through the set up process and operation sequence, ensuring a reliable and efficient heating system.
Setting Up the Oil Burner
Before installation, we ensure all components of the oil burner are complete and free from damage. We follow these steps:
- Positioning: The oil burner must be securely positioned to align with the furnace or boiler. This prevents vibration and ensures stable operation.
- Oil Flow Connection: Oil lines are connected to the burner, ensuring no leaks are present.
- Electrical Wiring: Wiring is carried out according to manufacturer specifications and local codes. All electrical connections must be tight and secure.
- Combustion Air Setup: We adjust the combustion air intake to provide the proper air-to-fuel ratio for efficient burning.
- Safety Controls: Installation of safety controls, such as the pressure gauge and high limit switch, is performed to monitor and regulate the burner operation.
A visual inspection, followed by a test run, confirms that the installation meets all required criteria.
Sequence of Operation
The oil burner’s sequence of operation is critical for safe and efficient heating:
- Thermostat Activation: When the room temperature falls below the set point, the thermostat sends a signal to start the burner.
- Safety Check: Safety controls verify that the system is in proper condition to operate.
- Ignition: The ignition process is initiated, and the oil pump begins to supply fuel to the burner.
- Flame Establishment: A flame is established and monitored; any irregularities trigger safety mechanisms to shut down the operation.
During operation, we continuously monitor the system, ensuring optimal performance and safety. Any maintenance or adjustments are conducted following the manufacturer’s guidelines and with a focus on longevity of the system.
Maintenance and Servicing
Proper maintenance and servicing are crucial for the longevity and optimal performance of an oil burner assembly. We focus on two key components: routinely inspecting critical parts and cleaning or replacing them as needed to ensure efficiency and safety.
Routine Inspection
To guarantee your oil burner operates efficiently, we conduct thorough inspections. During these service calls, we scrutinize the nozzle, electrodes, and filters—a routine checklist forms the core of our inspection protocol.
- Nozzle: Examine for clogs and wear. If the spray pattern is irregular, it may require replacing.
- Electrodes: Check alignment and signs of wear. Misalignment can hinder ignition.
- Filters: Assess for blockages. A dirty filter reduces oil flow and efficiency.
Inspection Table:
| Component | Check For | Action If Faulty |
|---|---|---|
| Nozzle | Clogs, wear, spray pattern | Replace as necessary |
| Electrodes | Misalignment, wear | Realign or replace |
| Filters | Blockages, dirt | Clean or replace |
We document each inspection thoroughly in our oil burner maintenance guide to maintain a history of the equipment’s condition and the services performed.
Cleaning and Replacing Parts
Cleaning and replacing parts are integral to our maintenance service to sustain your oil burner’s effectiveness.
- Cleaning: We regularly remove soot and debris from various components. This includes the burner’s interior and the surrounding area, ensuring there are no obstructions and that air and oil can flow freely.
- Replacing Parts: Certain elements such as the nozzle, filters, and possibly other replacement parts must occasionally be changed to maintain the system’s reliability.
Maintenance Schedule:
- Daily/Weekly: Homeowner checks for noises or soot; professional cleaning may not be required.
- Monthly: Professional inspection of nozzle, electrodes, and filters.
- Annually: Comprehensive service call for deep cleaning, adjustment, and parts replacement.
Attentive maintenance and timely servicing can greatly extend the life of your oil burner assembly and prevent costly future repairs.
Troubleshooting and Diagnostics
Before proceeding with repairs, we must accurately identify issues and perform precise diagnostics to ensure the longevity and performance of the oil burner assembly.
Identifying Common Issues
Smoke emission: Excessive smoke can signal incomplete combustion. We need to check if the nozzle is clogged or if there’s improper air-to-fuel ratio.
- Oil leaks: Inspect the tank, supply lines, and fittings. Tightening or replacing parts may be necessary if we find signs of leaking.
Ignition transformer: A faulty transformer may prevent the burner from starting. We verify its function by checking for a strong spark.
Manuals Reference: Refer to the specific oil burner manual for guidance on normal operation parameters.
Advanced Diagnostics
Performance Metrics: Use gauges to measure pressure and vacuum levels in the system. A deviation from the manual’s specifications indicates a problem.
- Safety Controls: Ensure all safety switches and controls operate according to the specifications to prevent dangerous malfunctions.
Sludge Detection: If performance is declining, we may suspect sludge buildup. Analyzing the fuel quality and tank conditions will confirm this.
Diagnostic Tools: Employ advanced diagnostic tools such as combustion analyzers to obtain precise readings of efficiency and emissions.
Energy Efficiency and Safety
In this section, we’ll examine the critical aspects of maintaining energy efficiency and ensuring safety in oil burner assembly repair and replacement. These two elements are paramount when dealing with any oil furnace or HVAC system, as they not only affect the operational costs but also have significant implications on household safety.
Optimizing Burner Efficiency
To optimize the energy efficiency of an oil burner, it is essential to keep the system well-maintained. This involves periodic cleaning and adjustment of the fuel unit and burner nozzles to achieve a proper spray pattern and atomization of fuel. Adhering to the burner’s schematic during maintenance helps in preserving the integrity of the system’s design. Regularly checking air-to-fuel ratios and employing modern oil burner controls can also enhance efficiency. Here’s a brief checklist for maintaining efficiency:
- Nozzle Inspection: Ensure it is clean and of correct specification.
- Fuel Pressure: Adjust according to manufacturer’s guidelines.
- Electrodes: Check positioning for optimal spark.
- Air Filters: Replace or clean to maintain proper air flow.
- Heat Exchanger: Inspect for soot buildup and clean as necessary.
Safety Precautions
Safety is a critical concern when repairing or replacing oil burners, as they are potent heat sources that can pose risks if not handled properly. Always turn off the power supply before commencing any work on the system. It’s imperative to wear appropriate protective gear and follow a schematic for the safe reassembly to avoid accidents. Here are key safety measures to follow:
- Turn Off Power: Shut down power supply to the furnace before starting work.
- Ventilation: Ensure good ventilation to prevent accumulation of fumes.
- Fire Safety: Keep a fire extinguisher accessible in case of emergencies.
- Leak Checks: Inspect for fuel leaks after any repair or replacement work.
- Professional Inspection: Have a certified HVAC professional review repairs to ensure compliance with safety standards.
Frequently Asked Questions
When dealing with oil burner assembly repair and replacement, we must consider both costs and proper maintenance to ensure longevity and optimal performance.
What are the typical costs associated with repairing or replacing an oil burner assembly?
Repair costs for an oil burner assembly can range greatly depending on the extent of damage. Minor repairs may cost a few hundred dollars, while a full replacement often exceeds $2,000. Pricing can vary based on the model and labor costs.
How can you determine the lifespan of an oil burner?
The lifespan of an oil burner largely depends on the model and the quality of maintenance performed. On average, well-maintained oil burners can last between 15 to 20 years. Regular servicing plays a crucial role in maximizing the burner’s lifespan.
What are the common signs that indicate a malfunctioning oil burner?
A malfunctioning oil burner may exhibit several signs, such as irregular heating, unusual noises, soot accumulation, increased fuel consumption, and odors. These symptoms suggest that the burner requires inspection and possibly repair or replacement.
What is the recommended frequency for replacing an oil burner?
Most oil burners require replacement after 15 to 20 years of operation. However, replacement may be needed sooner if the unit is not properly maintained or if frequent breakdowns occur.
What steps are involved in the process of fixing an oil burner?
Fixing an oil burner typically involves inspection, diagnosis, and repairs. This process includes cleaning the burner, replacing filters and nozzles, checking electrodes and ignition components, and ensuring proper combustion and venting. In some cases, more extensive repairs may be required.
Can the efficiency of an oil burner be improved and, if so, how?
Yes, the efficiency of an oil burner can be improved with regular maintenance, including cleaning, proper adjustment, and timely replacement of components like filters and nozzles. Upgrading to a high-efficiency burner unit can also result in a significant improvement in performance.